Trimming a puppy’s nails is a crucial part of their grooming routine, just as bathing and drying them.
Whether your puppy is 8 weeks old, an older dog, or if you’re tackling this at home for the first time, this How to Trim a Puppy’s Nails guide will help you navigate the process effectively, ensuring a comfortable experience for your furry friend.
Health Implications of Untrimmed Nails
Discomfort and Health Risks: Overgrown nails can cause discomfort and lead to health issues for puppies. They can affect your puppy’s posture, walking comfort, and even lead to painful nail splitting or infections. Untrimmed nails can grow into a spiral shape, potentially curling into the paw, which may require veterinary attention.
Signs Nails Need Trimming: It’s crucial to trim a puppy’s nails when they become too long. Nails that curve and touch the ground or produce a clicking sound when your puppy walks are indicators that it’s time for a trim.
When Can I Start To Trim a Puppy’s Nails
Begin nail trimming when your puppy is around 8 weeks old to familiarize them with grooming early on.
For new puppies, allow them a few days to settle into their new home before starting.
Once your puppy seems at ease in their new home and with you, you can begin the nail trimming routine.
Starting early and gradually will help make nail trimming a stress-free experience for your puppy as they grow. Remember, patience and positive reinforcement are crucial in these initial stages.
Things to Prepare for Nail Trimming
Before beginning, choose one of the trimmers by understanding each one’s use:
- Scissor-Style Trimmers:
- Pros: Offer good control, making them ideal for larger breeds with thicker nails. Provide a clean cut.
- Cons: Require more strength and steadiness to use. Not suitable for small breeds.
- Guillotine-Style Trimmers:
- Pros: Easier to use on smaller breeds with thinner nails. Good for precision trimming.
- Cons: The blade needs regular replacement. Not ideal for thick nails.
- Nail Grinder:
- Pros: Gentle, ideal for puppies that are scared of clippers. Great for fine-tuning nail length.
- Cons: Can be noisy, which makes puppies anxious. Requires patience and practice.
Also, you would need to prepare this for emergencies:
- Styptic Powder: Essential for stopping bleeding if you accidentally cut the quick.
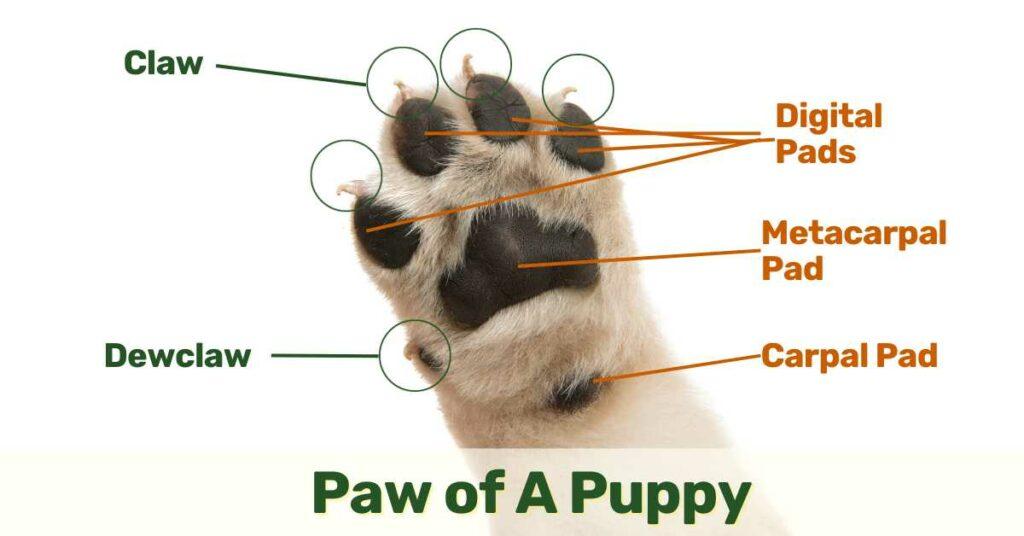
Understanding Your Puppy’s Paw
Before starting the trimming process, it’s important to understand the anatomy of your puppy’s paw:
- Claw: The hard part of the paw that needs trimming.
- Dewclaw: An extra claw located higher on the paw; only some dogs have this.
- Pads: The soft, cushioning part of the paw. Some might even have squishy toe beans!
Preparing Your Puppy for Nail Trimming
Do not jump in and expect to trim their nails successfully at one go. Just like us going to a manicurist for the first time, your puppy needs time to trust you with nail trimming.
Ease your puppy into nail trimming over several days:
Day 1: Introduce the nail trimmers, allowing your puppy to sniff and explore them.
Day 2: Gently handle your puppy’s paws, pressing softly to extend the nails.
Day 3: Mimic the trimming action by touching their nails with the clippers without cutting.
Step-by-Step Nail Trimming
On Day 4, you are ready to trim the nails:
- Hold the Paw:
Gently hold your puppy’s paw, applying slight pressure to expose the nails. Stay calm and reassure your puppy as you do this, they can sense if you are anxious. - Identify the Quick:
In clear nails, it’s the pink part. In darker environments, use your phone’s flashlight to better identify the quick.
Trim at a 45-degree angle to avoid cutting the quick.
For black nails, trim a little at a time and look for a dark dot, indicating the beginning of the quick. - Trimming:
Trim just a small section of the nail at a time, avoid cutting into the quick. For clear nails, stop when you see a small circle in the center. For dark nails, make tiny clips. - Reward:
After trimming each nail, reward your puppy with a treat and praise.
Advanced Nail Trimming Techniques
Making Nails Less Sharp: After trimming, use a nail file or grinder to smooth any sharp edges.
Cutting vs. Filing: Decide based on your puppy’s tolerance and the condition of their nails. Cutting is quicker, but filing can be less stressful for sensitive puppies.
What If I Accidentally Cut My Puppy’s Quick (Blood Vessel)?
First Aid for Cutting the Quick:
- Stay Calm: It’s common to accidentally clip the quick. Remain calm to avoid stressing your puppy.
- Apply Styptic Powder: Press styptic powder onto the nail to stop bleeding.
- Comfort Your Puppy: Reassure them with soothing words and a treat.
- Seek Veterinary Attention if Necessary: If bleeding persists for more than an hour, consult a vet.
Regular Trimming and Its Benefits
Trim a puppy’s nails every 3-4 weeks. Active puppies who frequently walk on hard surfaces may wear down their nails naturally, requiring less frequent trims.
Regular trimming can encourage the quick to recede, making it easier to keep the nails short and healthy. Shorter nails reduce the risk of painful overgrowth and curling into the paw.
When to Seek Professional Help
If trimming at home is too challenging, or if your pooch is particularly uncooperative, professional groomers are well-equipped to handle this task. Puppies can usually start visiting groomers once they’ve had their vaccinations.
Conclusion
Nail trimming is an integral part of your puppy’s grooming routine, alongside brushing and bathing. With the right tools, approach, and patience, nail trimming can become a routine part of your puppy’s grooming, ensuring their well-being and comfort.